When you build your presentation, you will typically add new slides (or "pages") to your presentation, move them around, and delete the slides that you no longer need. All these actions, along with the creation and management of sections, which are used in tables of contents and slide navigation, are enabled in the Slides panel. This panel (typically at the right-hand side of the canvas) allows you to interact with the slides structure, using drag and drop to change the order of slides in your presentation, right-click to open context menu options, and double-click to open slides on the canvas for editing.
In addition to these basic functionalities, the Slides panel in Present Pro also includes options relating to the masters used by the slides in this presentation. These options allow you to select whether or not to use the Cover or Content masters in this presentation, and also allow you to open the masters on the canvas for editing.
- For more general information about the workspace, see Present Pro Workspace
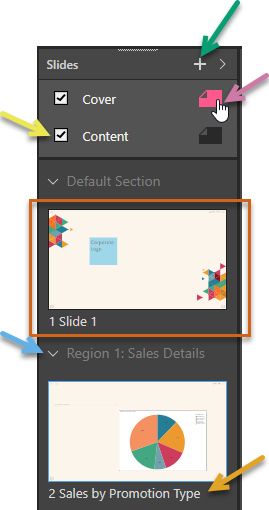
Slides panel
Master pages
Masters are part of your selected theme, and ensure that all slides contain some common formatting (for example, custom headers and footers). Present allows two types of master: a Cover master that applies a particular layout and appearance to the first slide in your presentation, and a Content master that applies the same appearance settings to all the other slides in your presentation (or all slides in your presentation where no Cover is selected). For more information about masters, see Master Pages in Present Pro.
|
Function |
Highlight |
Description |
|---|---|---|
|
Enable master |
Yellow arrow |
Select the checkbox to enable the master for this presentation:
Note: If you clear both of these checkboxes, no master is used for this presentation at all. Note that this removes background images, headers and footers, and so on from your slides but does not affect the chosen theme colors or your presentation's runtime options (the hamburger menu, re-do, undo, and so on options, and navigation options). |
|
Edit master |
Purple arrow |
Click the Slide icon alongside either Cover or Content to open the master on the canvas for editing. You can tell you are editing the master in the canvas, and not a page in your actual presentation, because the presentation background displays a hashed pattern and the Master ribbon is shown above the canvas. Note: When you edit your master pages in this view, the changes you make (adding text, adding images, and so on) apply to the cover of the presentation or to every content page in the presentation if the master is in use. This functionality is typically used to brand your presentation; placing slide numbers or a header image on every page. You cannot add visuals or slicers to your masters. |
Slide options
|
Function |
Highlight |
Description |
|---|---|---|
|
Add Slide |
Green arrow |
Add a new slide to your presentation. The new slide is added immediately after the currently selected slide or, if a section is selected, at the end of that section. Tip: You can, alternatively, create a new slide from either the option on the overhead ribbon or the right-click context menu. |
|
Section |
Blue arrow |
Your slides can be organized into meaningful "sections" for easy reading. For example, a global business could create sections of slides reflecting each region or each area of the business.
|
|
Thumbnail |
Red box |
Each slide is represented by a thumbnail. The thumbnail gives a visual impression of what is on the slide. You can double-click the thumbnail to open the slide on the canvas for editing. Note: The slide that is currently selected in the panel is highlighted using a border. |
|
Slide name |
Orange arrow |
Each slide has a number and name. The number is assigned automatically based on the position of the slide, and the name can be updated at any time to reflect the slide's content. |
* The Runtime navigation option is configured for your presentation in the Master ribbon. For details about this and other master configuration options, see Master Page Ribbon in Present Pro.
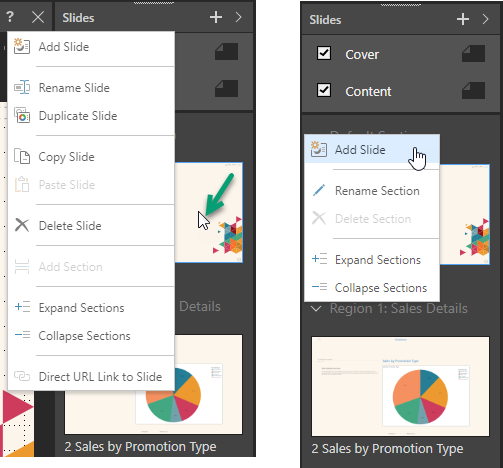
Context menus
The right-click context menu allows you to interact with the slides and sections in the Slides panel. The options differ depending on whether a slide, section, or nothing is selected:
|
Function |
What is selected? |
Description |
|---|---|---|
|
Add Slide |
Anything in panel |
Add a new slide to your presentation. The new slide is added immediately after the currently selected slide, at the end of the slide sequence if no slide is selected, or, if a section is selected, at the end of that section. Tip: Alternatively, you can add a new slide using the option in the overhead ribbon. |
|
Rename Slide |
Slide |
Change the name of the Slide. Note: This does not affect the slide number, which is automatically assigned based on the slide's position in the presentation. |
|
Duplicate Slide |
Slide |
Create a copy of the selected slide in the same location as the original. |
|
Copy Slide |
Slide |
Copy the slide to your clipboard. |
|
Paste Slide |
Panel or Slide |
Paste a copied slide from your clipboard to the current location. |
|
Delete Slide |
Slide |
Remove the slide from the presentation entirely. |
|
Add Section |
Panel |
Create a new section with a custom name to group one or more of your slides. Note: A Default Section is created to contain any slides that are not added to your custom sections. |
|
Rename Section |
Section |
Change the name of the Section. |
|
Delete Section |
Section |
Remove the section from the presentation entirely. When you delete a section, you do not delete its slides. The slides are either moved to the Default Section or, if you are deleting the last section, to no longer be in any section. |
|
Expand Sections |
Anything in panel |
Open all the sections in the Slides panel. This allows you to see all the slides in the panel. |
|
Collapse Sections |
Anything in panel |
Close all the sections in the Slides panel. This hides the slides but allows you to see the section structure. |
|
Slide |
Copy the URL to your clipboard. A user with appropriate access can use this URL to open the runtime version of the presentation starting at the selected slide. Note: The URL query string points to the slide using its presentation ID and slide number. If you delete the slide at this location (you linked to slide six and now your presentation only has five slides), the link will go to the home page for the presentation. If you delete the entire presentation, clicking the link will show an error. |